7 Gmail Tips to Make the Most of Your Inbox!
Organizing mails once your inbox is flooded with them can be a real drag. Even more taxing is making your way around the inbox when it’s disorganized and all the mails are cluttered around haphazardly. Thankfully, Gmail provides its users with innumerable options to make this task much simpler. Here are seven hacks to make your inbox a clean, welcoming place to be in every morning, or every time you access it:
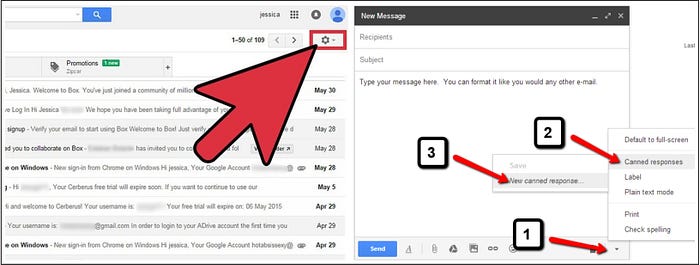
Canned Responses: Too often, you find yourself writing the same response to different emails over and over again. If this is a problem that sounds very familiar to you, canned Responses is your go-to solution. Click the gear icon on the right corner of the inbox, go to Settings → Labs, and enable canned Responses. After this, compose a new e-mail to create your own custom canned response. Once you’ve entered it in, click on “more options” on the bottom right (the downward arrow) and give a name to your canned response by clicking on the option. To use it, simply right click and choose the appropriate response and you’re good to go!
Undo Send: One of my favourite hacks, Gmail offers its users a chance to undo sent mails that saves us a lot of embarrassment in the event of an accidental send. All we have to do is enable the undo option under Settings→Labs as well as Settings →General. We also can choose the upper limit on the number of seconds after sending the mail for which the undo option disappears.

Verify Sender Legitimacy: Labs is quite the treasure chest of cool features hiding in plain sight. One of its other extremely helpful tools allows us to distinguish genuine mails from spams, and can be a very important tool in making our inbox look much cleaner when complemented with appropriate labels. Go to labs, and turn on Authentication Icon for Verified Senders. The next time you receive an e-mail from one such verified sender, you’ll see a little key icon next to their name.

Personal Level Indicators: This is a great tool to help you with scheduling responses to your e-mails based on its urgency. Personal Level Indicators allow you to figure out which e-mails were sent to you alone, or were sent to you as a circular e-mail or as a part of a mailing list. Turn on the Show Indicators button in Settings → General, and save changes. The following icons will appear in your e-mails hereon:
- A single arrow (>) indicates the e-mail was sent to a small group of people, including you and a few others.
- A double arrow (>>) indicates that the e-mail was sent to you alone.
- No arrow implies you received the e-mail as a part of a mailing list.
Aliases: This is one feature not many use, or even know of, for that matter. Gmail treats e-mail IDs separated by a ‘ . ’ or a ‘ + ’ as the same, and redirects all the mails addressed to those IDs to a single inbox. That is, e-mails addressed to IDs such as yourexample@gmail.com and your.example@gmail.com are sent to the same inbox. Additionally, you can set up aliases by adding a ‘ + ’ symbol at the end of your ID to filter mails. For example, you can use the address yourexample+work@gmail.com for work-related mails and type in “work” in your search bar to filter out all the mails pertaining to the work account and attach labels to them to make navigating around your inbox easier than it already is, thanks to this hack!
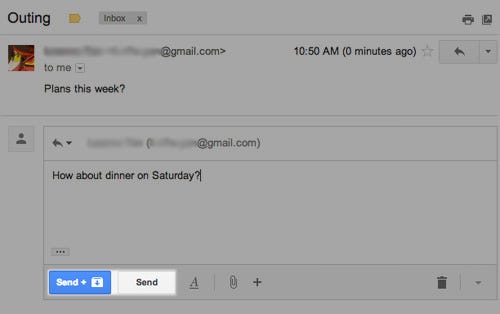
Send and Archive: Archiving mails without deleting them goes a long way towards de-cluttering your inbox and making it more organized while saving time. To that end, every mail you send out can be archived with a click of a button by enabling the ‘Show “Send & Archive” button in reply’ in Settings → General.
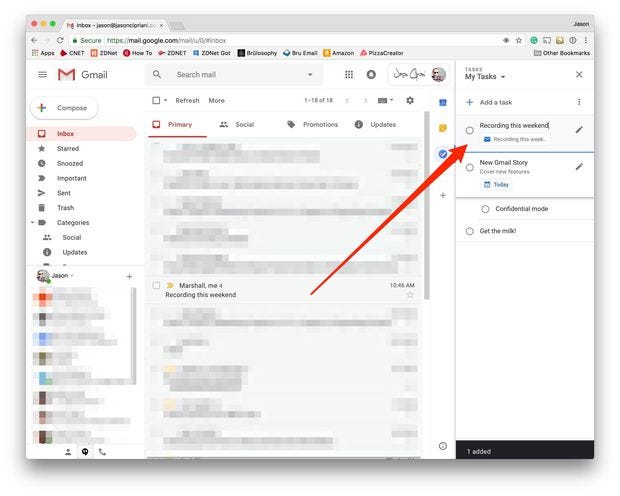
Tasks: Gmail allows you to add To-Do lists right inside your inbox, along with turning mails into tasks themselves. To create your own To-Do list, click on ‘Tasks’ in the drop-down menu that appears once you click on the Gmail button on the right side of your inbox. You can add due dates and other details to it as well by accessing the > button present with the task. E-mails can also be turned into tasks by checking the square next to it in the inbox or by using the More → Add to Tasks option inside the mail. This allows you to schedule your task, or just to reply to the mail later if need be, complete with reminders and links to the mail.
